
I had everything but the new fabric and the elastic, but the fabric was on sale half off, so these pants cost me $6 and change.
I went to Joanne's fabrics and fell in love with a micro-super-soft fleece fabric that they had. I wanted to make warm pajama/lounge bottoms out of it.
You will need:
An existing pair of lounge pants
Fabric for your body. (I'm 5'6, waist 28", so all I needed was 1.50 yards of 44" fabric)
1" wide ribbed elastic (cut to fit around your waist)
Thread
Sewing machine
Ground rules: make this according to the measurements of your body.
*Add an extra 2" along the top so you can fold over the waistband for the seam
*Add at least 4" to the legs, as they will almost always end up shorter than you intended (after hemming).
*Add about 5/8" extra along all sides (top, hem, and seams) so that you can sew it.
Step 1: Fold your existing lounge pants in half, making sure that the seams are perfectly folded.
 |
| My seam wasn't perfectly folded on the right side there |
Step 2: Fold your new fabric in half, and lay your old pants on top of it, with the front seam of the pants in the center of the fabric (In my pic, the right side of the pants is what lies along the center). Trace it with tailor's chalk or washables or whatever works.
*you want the point you traced to be intended for the BACK of the crotch on this fold
Step 3: Now fold your old pants the other way, so that the FRONT of the crotch is the point that is showing. Roll your pants the other way, keeping the front seam where it is, and trace it.


This is what it should look like. The LEFT point is the back of the crotch, and the RIGHT point is the front. (see how they are at different heights?)
Since the fabric was folded in half, you should have two pieces of the below image cut out.

Step 4: Now, grab the "crotch points" on ONE leg of the pants, and pin them together. Follow the leg seam down from there to the bottom of the leg. Do not pin or sew above the crotch points.
You are basically sewing the sheathes for the legs (but not connecting them together yet.)
 |
| This is one pant leg. (Sewing from the crotch down the leg.) |
 |
| Pippin decided that he'd help me. |
 |
| Pant leg #2 |
Step 5: This is a little complicated, so I'll explain it very carefully.... grab your two separate pant legs (which should be sewn down the legs but not sewn above the crotch points). Match up the behind crotch points of each leg, and pin them together. Match up the front crotch points and pin them together too. The whole garment should still be inside out.
You are basically sewing each of the colors to their matching colors.

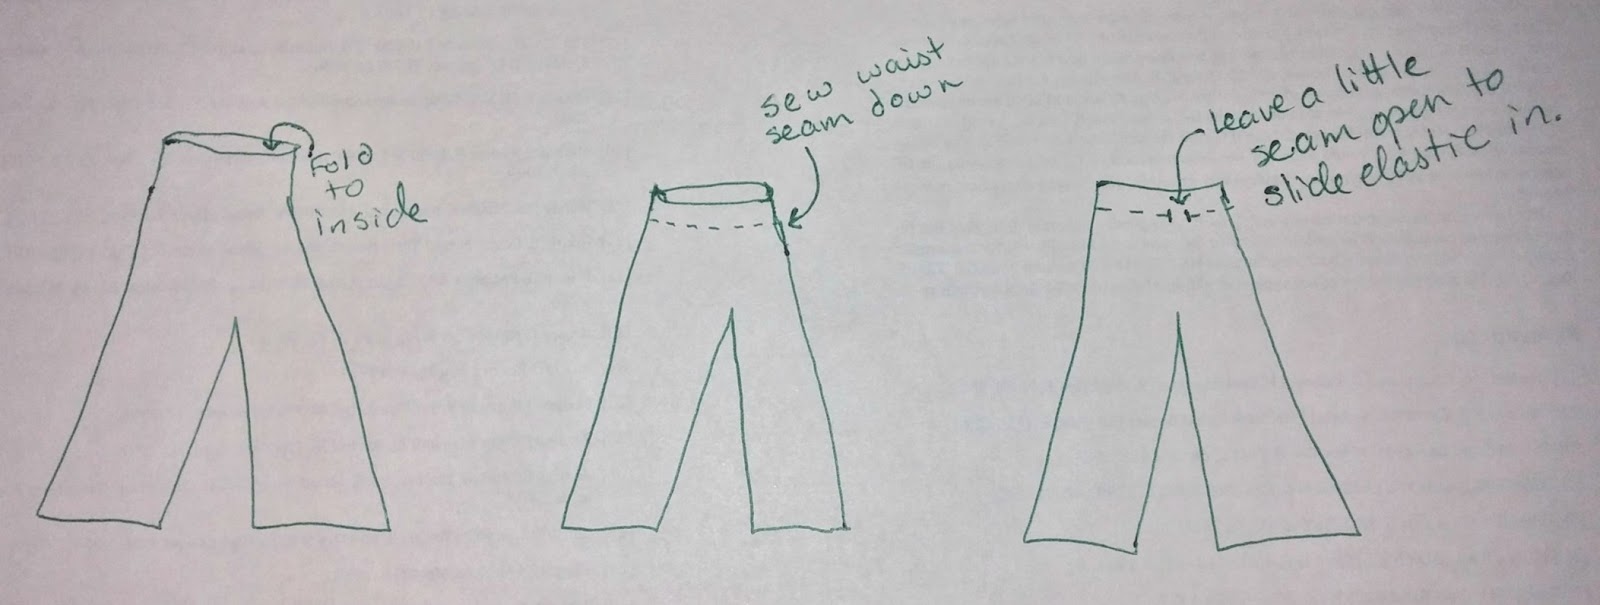
Step 6: Fold over the waist band so that you have 1.5" of space, and pin it. Sew the waistband over, but leave a one inch opening so you can insert the elastic.

(sewing the waistband down....)

Step 7: You should have the elastic marked to be larger than your waist. Put a safety pin in one end of the elastic and use the pin to feed the elastic through the waistband.

Here is how it looked after I fed the elastic through:

Step 8: Try on your pants, and adjust the elastic to fit. While still wearing the pants, use a safety pin to hold the elastic at what was comfortable for you.
Step 9: Sew the ends of your elastic together, and then sew the waistband shut. I also put a few stitches in the front and sides of the elastic (through the pants), so that the elastic wouldn't shift or twist inside the pants.
Step 10: Put on your pants on again, and mark how long you want them to be. FOLD the hem along your marking. Pin it, and try them on again to make sure the length is good for you.
Step 11: Hem the legs. Most fleece fabrics won't need you to do this, but I got a fancy micro fleece fabric that needed to be hemmed. (When I bought it, the lady said that this type of fleece won't work for those tie-together blankets since it would unravel.)
If my instructions here are a little too complicated, there is another blog with instructions for these pants (but kid sized), and maybe those instructions might help you better?
Simply Modern Mom:
http://www.simplymodernmom.com/2011/01/simple-pajama-pants-tutorial/
This gal did such an awesome job making these pants for her kids. So, as a supplement to her project, here's what I did for pajama pants for adults
And you have a cozy pair of lounge pants, in the pattern that you want, made out of the fabric that you want. I love mine!

So cozy and fuzzy. <3 br="">
You are basically sewing each of the colors to their matching colors.

Step 6: Fold over the waist band so that you have 1.5" of space, and pin it. Sew the waistband over, but leave a one inch opening so you can insert the elastic.
(sewing the waistband down....)

Step 7: You should have the elastic marked to be larger than your waist. Put a safety pin in one end of the elastic and use the pin to feed the elastic through the waistband.

Here is how it looked after I fed the elastic through:

Step 8: Try on your pants, and adjust the elastic to fit. While still wearing the pants, use a safety pin to hold the elastic at what was comfortable for you.
Step 9: Sew the ends of your elastic together, and then sew the waistband shut. I also put a few stitches in the front and sides of the elastic (through the pants), so that the elastic wouldn't shift or twist inside the pants.
 |
| Sewed the elastic together... |
 |
| Cutting the legs to size. |
If my instructions here are a little too complicated, there is another blog with instructions for these pants (but kid sized), and maybe those instructions might help you better?
Simply Modern Mom:
http://www.simplymodernmom.com/2011/01/simple-pajama-pants-tutorial/
This gal did such an awesome job making these pants for her kids. So, as a supplement to her project, here's what I did for pajama pants for adults
And you have a cozy pair of lounge pants, in the pattern that you want, made out of the fabric that you want. I love mine!
 |

So cozy and fuzzy. <3 br="">